In this lesson ,I talk to you about one of the most basic of concept of flutter
Use all the time to design our applications.
This is a container widget.
Now a container widget for those who have done a bit of web development or web design.
It's like a div.
You can move it by placing it on the screen and then you give a child to show images,text and some other propertis .My top tip ,whenever, you use new widget in flutter it start from documentation.
As I said you above, the documentation was really good and all you have to do to find it.
We are going to Widget Catalogue then you will find it for Flutter development
you can see that the team has sorted all the widgets based on their actions.
And we've really seen some of those images and assets
Layout section and other widgets that allow you to create other widgets to hold things.
Under widget design.
You can see that they are divided into single child widget and multi child widget, a widget that can contain
A widget includes a piece of text or an icon or many different widgets, such as five images or a single image and a piece of text.
In this module, we are going to look for a child and multi-channel things to learn.
How to design your screen the way you want it to look.
The most commonly used child widget is a container.
Your can see a container class below and it's the widget that lets us get into position.
Container class
A combines common painting ,positioning ,and sizing widgets.
And one thing it does tell you is that childless containers should try to be as large as possible
And that's what we're seeing here.We have a container that is currently trying to get as big as possible.
import 'package:flutter/material.dart';


void main() {
  runApp(MyApp());
}

class MyApp extends StatelessWidget {
  @override
  Widget build(BuildContext context) {
    return MaterialApp(
      home: Scaffold(
        backgroundColor: Colors.white,
        body: Container(),
      ),
    );
  }
}
How do we know
Well, we give it a color teal.
import 'package:flutter/material.dart';
void main() {
  runApp(MyApp());

}

class MyApp extends StatelessWidget {
  @override
  Widget build(BuildContext context) {
    return MaterialApp(
      home: Scaffold(
        backgroundColor: Colors.teal,
        body: Container(),
      ),
    );
  }
}
Let's see for ourselves
import 'package:flutter/cupertino.dart';
import 'package:flutter/material.dart';void main() {
  runApp(MyApp());
}
class MyApp extends StatelessWidget {
  @override
  Widget build(BuildContext context) {
    return MaterialApp(
      home: Scaffold(
        backgroundColor: Colors.teal,
        body: Container(
          color: Colors.white,
        ),
      ),
    );
  }
}
import 'package:flutter/material.dart';
void main() {
runApp(MyApp());
}

class MyApp extends StatelessWidget {
@override
  Widget build(BuildContext context) {
    return MaterialApp(
      home: Scaffold(
        backgroundColor: Colors.teal,
        body: Container(
          color: Colors.white,
          child: Text("Hello"),
        ),
      ),
    );
  }
}
As stated here.Container without children.Try to be as big as possible, there is currently nothing in the children's property in our container.So try to be as big as possible.But what if we gave him a child?
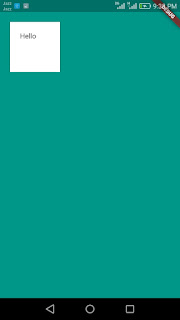
What if we give it a secondary widget?This is a phrase that says hello.Let's press and immediately our our container is reduced to the size of a secondary widget and we can have .Get to know your children by reading the documentary container about it Size and in this case our child is a piece of text and its size is determined by its font size.
That piece of text.Now at this point, you can see that all the text is slightly hidden from our text Depending on the screen of the iPhone and Android, depending on the device you're copying.
Mark like this So the way we put our content on the screen, how do we protect it from all these border elements The top bar where we have our time and our signal and our input floating really comes with a Simple widget that does just that.This is called a safe area and everything you put in a safe area will be in those areas
import 'package:flutter/cupertino.dart';
import 'package:flutter/material.dart';
void main() {
  runApp(MyApp());
}

class MyApp extends StatelessWidget   @override  Widget build(BuildContext context) {
    return MaterialApp(
      home: Scaffold(
        backgroundColor: Colors.teal,
        body: SafeArea(
          child: Container(
            color: Colors.white,
            child: Text("Hello"),
          ),
        ),
      ),
    );
  }
}
There is no sign or hotspot like this part on the iPhone.
To embed our container in a safe area, we can hold the option or reverse and press Enter to drag.Add the steps of our intention here to our small menu and I'm going to wrap up my container which is at the moment Inside new widget is selected and all this is to put our old container in a new widget
And defines it as the child of this widget.So now we can change this widget and I would call it a safe area with Capital S and A above TO
Now as soon as I hit the safe, you will see that my container has gone back.
When you create a user interface that you don't want to bleed all the way
Edges but instead you want to see it from the front of the user.
You use your safe area.
Edge but instead of what you see as complete to the user
Then you are about to use your Save Area.
What else can you do with your container?
Width and Height.
Well we can change its size as well as its width and height.
So if we just go ahead and add a new property called height and let's fix it at one hundred pixels
One hundred points and let's change the width to a hundred.
So now we should have 100 to 100 square containers as soon as I hit the safe.
import 'package:flutter/cupertino.dart';

import 'package:flutter/material.dart';

void main() {
  runApp(MyApp());
}

class MyApp extends StatelessWidget {
  @override
  Widget build(BuildContext context) {
    return MaterialApp(
      home: Scaffold(
        backgroundColor: Colors.teal,
        body: SafeArea(
          child: Container(
            color: Colors.white,
            height: 100,
            width: 100,
            child: Text("Hello"),
          ),
        ),
      ),
    );
  }
}
And you go there.
We have our square container with a lonely child who is a piece of text that says hello now
If I want my container to be a little offset from the edges of the screen.
Margin
What if I want to set a margin for my container?
OK I can use margin property and to define margin property we have to use something called Edge inserts.
And you can see that there are different types of edge insertions that you can all user This means that whatever you enter here is said to be set to 20 pixels on all four sides.
import 'package:flutter/cupertino.dart';
import 'package:flutter/material.dart';
void main() {
runApp(MyApp());
}
class MyApp extends StatelessWidget {
@override
Widget build(BuildContext context) {
return MaterialApp(
home: Scaffold(
backgroundColor: Colors.teal,
body: SafeArea(
child: Container(
color: Colors.white,
height: 100,
width: 100,
margin: EdgeInsets.all(20),
child: Text("Hello"),),),
),
);
}
}
Your container
So left to right and down to now a little distance of 20.
What if we didn't want that?
What if we just want to keep it up and down?
Well then you can use balance
So now you could say I want 50 for vertical axes but only for horizontal axes.Want to keep 10 for margin.So now if we hit the savings, you can see that it's offset from the top 50 and left and right.
Only 10
And you can always easily see it by going to the Flattery Inspector and clicking on this button here.
And now you can see that the top and bottom of our container are 50 and left and right
Being 10 and you can also see the safe space that is now here instead of syncing with this box
Where you provide the same value for the upper bottom and the same value for the left and right that you can also provide
Give it different values on each side so you can tell LTE RB either way.
So it's from left to top right and bottom left.
Suppose it's 30 top 10.
Okay fine
50 down 20 on each side.
I have given a different margin and now that I have hit the savings you can see how our box changes.
You can see that left 30 is above 10, right is 50 and bottom is 20.
So this box is what our margins are doing on our screen but if you don't want four values
Clearly you can just use that to say just set a margin to the left which is 30 and now everything
Otherwise one zero is left and only the left gets this margin.
So there are various ways that you can do this now.
If you want the baby in the container to be a little more offset from its edge
Container
In this case you do not use margins and you will use a recruitment instead.
So if you've ever worked with CFS or web design then it will all feel very intuitive to you.
And keep in mind that the fluttering team actually comes from a web development background.
This is one of the reasons why doing this job can be so familiar and so intuitive. So for recruitment, it also expects an edge.
So let's go ahead and provide one.
Padding
And it allows us to determine fundamentally different values for the padding for the four edges of anything.
That is, we are compiling it, which is our container in this case
Let's add a recruitment for all sides.
That's 20.
import 'package:flutter/cupertino.dart';

import 'package:flutter/material.dart';

void main() {
  runApp(MyApp());
}

class MyApp extends StatelessWidget {
  @override
  Widget build(BuildContext context) {
    return MaterialApp(
      home: Scaffold(
        backgroundColor: Colors.teal,
        body: SafeArea(
          child: Container(
            color: Colors.white,
            height: 100,
            width: 100,
            margin: EdgeInsets.all(20),
            padding: EdgeInsets.all(20),
            child: Text("Hello"),
          ),
        ),
      ),
    );
  }
}
And when I hit the savings you will see that I now have a small box inside my container that is restricting it.
The child is still in the area.
And if I go ahead and remove all these guidelines, you can see that that's what I ended up with.
I have a container that has been slightly removed from the edges of the screen and I have found its contents
Pushed away from the edges of the container.
So the margin is for the exterior of your widget and the recruitment inside your widget.
And remember that there can only be one child in the container.
Okay fine
So for example I can't have a piece of text and maybe say a picture that won't work because remember
You can only have one widget child
So we're just laying a baby in the next lesson for which we'll consider some methods
Laying multiple children using widgets like columns and rows.
So all this and I will see in the next lessons.


Comments
Post a Comment